

For some reason, you may need to take a full or partial screenshot on your Windows 10 or Windows 11 computer. You can just use the Windows built-in tools or keyboard shortcuts to do this work and it is very simple. In this post, Winsor Consulting will show you some methods that are suitable for you. There are several methods you can use. Whether you want to save the entire screen or just a piece of it, we’ve rounded up all the best ways to take a Windows screenshot
The Print Screen Button
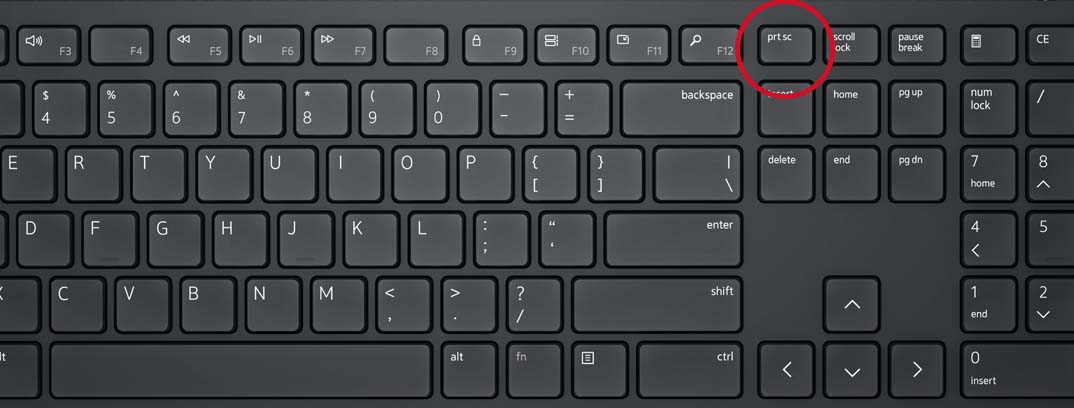
Here you can see the PrtScn Button. It may require you to use the FN button.
There is a Print Screen key on your keyboard. Just like the name of the key, it is used to print the current screen of your computer. If you are using a wired keyboard, it is usually on the top-right side of the keyboard. If you are using a laptop, you can find it on the top line or the bottom line of the keyboard. The Print Screen can be shown as Print Screen or PrtSc.
- Press the Print Screen Key and you will see a small menu on the top middle side of your computer screen.
- Select the area you want to capture. The screenshot will be saved to the clipboard. Of course, you can click one of the icons in the menu according to your need to take a screenshot.
- Open an application like Paint or Word and paste the screenshot to it.
- Edit the screenshot or save it to a suitable location.
The screenshot will be copied to your clipboard. To save the file, paste the screenshot into any program that allows you to insert images, like Microsoft Word or Paint.
Paste your screenshot into a program like Paint to save and edit it.
The Windows key + Print Screen
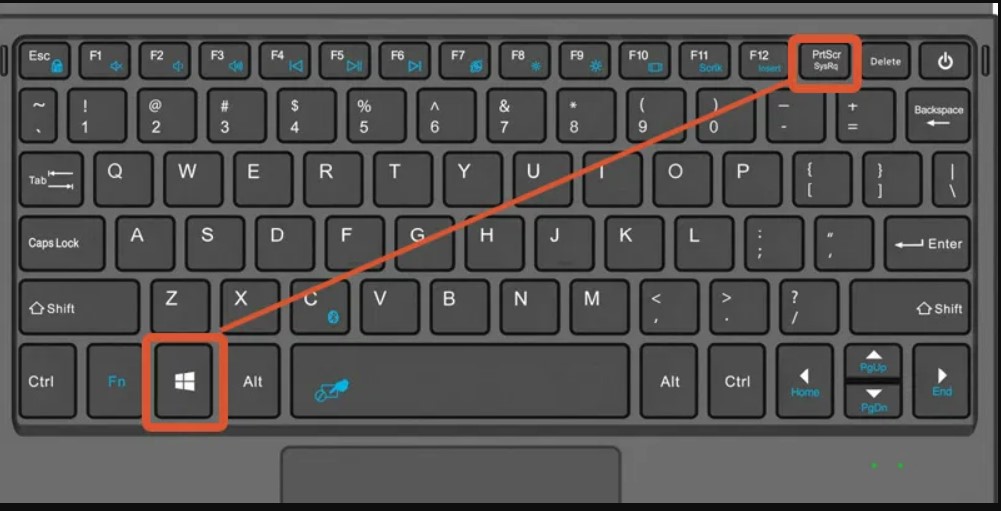
To take a screenshot on Windows 10 or Windows 11 and automatically save the file to the Screenshots folder, press the Windows key + PrtScn. Your screen will go dim and a screenshot of your entire screen will be saved to the folder.
Alt + Print Screen
To only capture the active window you’re working in, press Alt + PrtScn. The screenshot will be copied to your clipboard, and you’ll need to paste it into another program to save it.
The Snip & Sketch tool in Windows 10
Windows 10 Snip & Sketch is the best way to screenshot on Windows if you’re looking to customize, annotate, or share your screen captures.
To activate Snip & Sketch, use the keyboard shortcut Windows Key + Shift + S. Your screen will go dim and a mini menu will appear at the top of your screen, giving you the option to take a rectangular, free-form, window, or full-screen capture.
With these Snip & Skitch options, you can choose how you’d like to take a screenshot:
| Mode | Function |
| Rectangular | Size a rectangle for your screenshot. |
| Free-form | Draw free-hand with your cursor. |
| Window | Choose a specific window to capture. |
| Full-screen | Grab an image of your entire screen. |
Click the menu to take a rectangular, free-form, window, or full-screen capture (from left to right).
After you capture the screenshot, it’ll be saved to your clipboard and a preview notification will appear in the bottom-right corner of your screen.
Click on the preview notification to open the Snip & Sketch app and save, share, or edit the screenshot with the available drawing tools.
The Snipping Tool in Windows 11
Although the Snipping Tool exists in Windows 10, it’s not usually the screenshot tool you’ll want to use. In Windows 11, the Snipping Tool got a major upgrade and it’s now the best way to take custom screenshots.
To start the Snipping Tool in Windows 11, you can search for it or press the Windows Key + Shift + S. Like Snip & Sketch, your screen will go dim and a toolbar of screenshot options will appear at the top of the screen. This toolbar will let you take a rectangular, freeform, full-window, or full-screen capture.
The snipping tool looks just like Snip & Sketch.
Once you’ve taken your screenshot, it’ll be copied to your clipboard so you can share it right away, and it will be saved to the Screenshots folder. If you click the preview that pops up in the bottom-right corner of your screen, you’ll be able to save and edit it.
Use The Game Bar
The Game Bar is an overlay you can use within most Windows apps and games to take screenshots and record videos. Follow the steps below to open and use it:
1. Press Windows Key + G.
2. In the overlay menu, click the Capture button – the camera icon – in the top menu to bring up the Capture menu.
You can take screenshots or screen recordings with the Game Bar.
3. In the Capture menu, click the camera icon to take a screenshot. You can also record a video clip by pressing the record button, with the option to include audio by clicking the microphone icon.
Screenshots and video clips captured by the Game Bar are saved in PNG and MP4 format and you can find them in the Videos > Captures folder in File Explorer. You can also find them through the Game Bar’s Gallery, by clicking Show my captures > See my captures underneath the screenshot and recording buttons in the Capture menu.
Power + Volume Up
To take a screenshot on Windows 10 with a Microsoft Surface device, press the Power Button + Volume Up Button. The screen will go dim, and your screenshot will save to the Pictures > Screenshots folder.
So, did you learn how to take a screenshot in Windows?
Did you take advantage of our tips for taking prints on your Windows PC?
Recent Comments